
OIDC App Guides
In the guides below, there may be omitted options when those options are set to the default value.
TIP
Placeholders are used for common settings, like your-client-id, your-client-secret, your-admin-role, https://app-name.example.com, and Copy from VoidAuth OIDC Info. OIDC (Endpoint) Info can be found in the dropdown tab on the admin OIDC and OIDC App pages, and is the recommended source of OIDC related Endpoint URLs.
CAUTION
Client IDs must be unique between OIDC Apps. Client Secrets must be long and randomly generated. The Client Secret field on the OIDC App page can be randomly generated and copied to the clipboard for use within the OIDC App. Client Secrets are encrypted on disk.
NOTE
The guides below are maintained by the community and may not always be accurate or current. If you notice any inaccuracies or have suggestions for improvements, please contribute those changes by submitting a pull request on the GitHub repository here.
 Actual Budget
Actual Budget can be set up to use VoidAuth as an OIDC Provider in three ways: through Environment Variables, Web GUI, or Config File. See the Actual Budget OAuth Documentation for full details.
Environment Variables:
ACTUAL_OPENID_DISCOVERY_URL="Copy from VoidAuth OIDC Info (OIDC Issuer Endpoint)"
ACTUAL_OPENID_CLIENT_ID="your-client-id"
ACTUAL_OPENID_CLIENT_SECRET="your-client-secret"
ACTUAL_OPENID_SERVER_HOSTNAME="https://actual.example.com"

# Optional
# ACTUAL_OPENID_ENFORCE="true"
# ACTUAL_TOKEN_EXPIRATION="never"
In VoidAuth OIDC App Page:
Client ID: your-client-id
Auth Method: Client Secret Post
Client Secret: your-client-secret
Redirect URLs: https://actual.example.com/openid/callback AFFiNE
Click on your user icon > Admin Panel > Settings > OAuth in AFFiNE.
AFFiNE OAuth Configuration:
OIDC OAuth provider config: {"args":{},"issuer":"https://voidauth.example.com/oidc","clientId":"your-client-id","clientSecret":"your-client-secret"}In VoidAuth OIDC App Page:
Client ID: your-client-id
Auth Method: Client Secret Post
Client Secret: your-client-secret
Redirect URLs: https://affine.example.com/oauth/callback Arcane
Arcane can be set up to use VoidAuth as an OIDC Provider in two ways: through the Web GUI or through Environment Variables. See the Arcane SSO Documentation for full details.
Environment Variables:
OIDC_ENABLED="true"
OIDC_CLIENT_ID="your-client-id"
OIDC_CLIENT_SECRET="your-client-secret"
OIDC_ISSUER_URL="Copy from VoidAuth OIDC Info (OIDC Issuer Endpoint)"
OIDC_SCOPES="openid email profile groups"
OIDC_ADMIN_CLAIM="groups"
OIDC_ADMIN_VALUE="your-admin-role"

# Optional: Merge accounts by email address
# OIDC_MERGE_ACCOUNTS="true"
In VoidAuth OIDC App Page:
Client ID: your-client-id
Auth Method: Client Secret Post
Client Secret: your-client-secret
Redirect URLs: https://arcane.example.com/auth/oidc/callback AutoCaliWeb
In AutoCaliWeb:
- Navigate to Settings → Configuration → Edit Basic Configuration → Feature Configuration
- In the Login Type dropdown, select
Use OAuth. - Scroll down to Generic and fill out the config as follows:
AutoCaliWeb OAuth Configuration:
generic OAuth Client Id: your-client-id
generic OAuth Client Secret: your-client-secret
generic OAuth scope: openid profile email
generic OAuth Metadata URL: Copy from VoidAuth OIDC Info (Well-Known Endpoint)
generic OAuth Username mapper: preferred_username
generic OAuth Email mapper: email
generic OAuth Login Button: VoidAuth
In VoidAuth OIDC App Page:
Client ID: your-client-id
Auth Method: Client Secret Basic
Client Secret: your-client-secret
Redirect URLs: https://autocaliweb.example.com/login/generic/authorized Beszel
Follow the Beszel OAuth Guide and select OpenID Connect (oidc) from the Add Provider dropdown.
Beszel OAuth Configuration:
Client ID: your-client-id
Client Secret: your-client-secret
Auth URL: Copy from VoidAuth OIDC Info (Authorization Endpoint)
Token URL: Copy from VoidAuth OIDC Info (Token Endpoint)
Fetch user info from: User info URL
User info URL: Copy from VoidAuth OIDC Info (UserInfo Endpoint)
In VoidAuth OIDC App Page:
Client ID: your-client-id
Auth Method: Client Secret Basic
Client Secret: your-client-secret
Redirect URLs: https://beszel.example.com/api/oauth2-redirect ByteStash
Environment Variables:
OIDC_ENABLED="true"
OIDC_DISPLAY_NAME="VoidAuth"
OIDC_ISSUER_URL="Copy from VoidAuth OIDC Info (OIDC Issuer Endpoint)"
OIDC_CLIENT_ID="your-client-id"
OIDC_CLIENT_SECRET="your-client-secret"
OIDC_SCOPES="openid profile email groups"

# Optional: Disable internal accounts to force OIDC-only authentication
# DISABLE_INTERNAL_ACCOUNTS="true"
In VoidAuth OIDC App Page:
Client ID: your-client-id
Auth Method: Client Secret Post
Client Secret: your-client-secret
Redirect URLs: https://bytestash.example.com/api/auth/callback Cloudflare ZeroTrust
Navigate to the Cloudflare ZeroTrust Dashboard > Settings > Authentication. In the Login methods tab, select Add new and choose OpenID Connect.
Cloudflare Configuration:
Name: VoidAuth
App ID: your-client-id
Client secret: your-client-secret
Auth URL: Copy from VoidAuth OIDC Info (Authorization Endpoint)
Token URL: Copy from VoidAuth OIDC Info (Token Endpoint)
Certificate URL: Copy from VoidAuth OIDC Info (JWKs Endpoint)
Proof Key for Code Exchange (PKCE): ON
OIDC Claims: mail, preferred_username
In VoidAuth OIDC App Page:
Client ID: your-client-id
Auth Method: Client Secret Basic
Client Secret: your-client-secret
Redirect URLs: https://your-team-name.cloudflareaccess.com/cdn-cgi/access/callback Dawarich
See Dawarich v0.36.0 release notes for more details on OIDC environment variables.
Environment Variables:
OIDC_CLIENT_ID="your-client-id"
OIDC_CLIENT_SECRET="your-client-secret"
OIDC_ISSUER="Copy from VoidAuth OIDC Info (OIDC Issuer Endpoint)"
OIDC_REDIRECT_URI="https://dawarich.example.com/users/auth/openid_connect/callback"
In VoidAuth OIDC App Page:
Client ID: your-client-id
Auth Method: Client Secret Basic
Client Secret: your-client-secret
Redirect URLs: https://dawarich.example.com/users/auth/openid_connect/callback Dockhand
Navigate to Settings > Authentication > SSO in Dockhand. Click Add provider. See the Dockhand OIDC Configuration Guide for detailed setup instructions.
Dockhand SSO Configuration:
Name: VoidAuth
Issuer URL: Copy from VoidAuth OIDC Info (OIDC Issuer Endpoint)
Client ID: your-client-id
Client Secret: your-client-secret
Redirect URI: https://dockhand.example.com/api/auth/oidc/callback
Scopes: openid profile email groups

# Optional Claim Mappings
Username claim: preferred_username
Email claim: email
Display name claim: name
In VoidAuth OIDC App Page:
Client ID: your-client-id
Auth Method: Client Secret Basic
Client Secret: your-client-secret
Redirect URLs: https://dockhand.example.com/api/auth/oidc/callback
NOTE
For role-based access control and group mapping features, an Enterprise license is required.
 Dockmon
Navigate to Settings > OIDC in Dockmon.
Dockmon OIDC Configuration:
Enable OIDC: (enable)
Provider URL: https://voidauth.example.com/oidc
Client ID: your-client-id
Client Secret: your-client-secret

# Optional
# SSO as default login: (enable)
In VoidAuth OIDC App Page:
Client ID: your-client-id
Auth Method: Client Secret Post
Client Secret: your-client-secret
Redirect URLs: https://dockmon.example.com/api/v2/auth/oidc/callback Grist
Grist
Environment Variables:
GRIST_OIDC_IDP_ISSUER="Copy from VoidAuth OIDC Info (OIDC Issuer Endpoint)"
GRIST_OIDC_IDP_CLIENT_ID="your-client-id"
GRIST_OIDC_IDP_CLIENT_SECRET="your-client-secret"
GRIST_OIDC_SP_IGNORE_EMAIL_VERIFIED="true"
In VoidAuth OIDC App Page:
Client ID: your-client-id
Auth Method: Client Secret Basic
Client Secret: your-client-secret
Redirect URLs: https://grist.example.com/oauth2/callback
PostLogout URL: https://grist.example.com/signed-out Immich
Navigate to Administration > Settings > OAuth Settings in Immich. See the Immich OAuth Documentation for full details.
Immich OAuth Configuration:
Issuer URL: Copy from VoidAuth OIDC Info (Well-Known Endpoint)
Client ID: your-client-id
Client Secret: your-client-secret
Scope: openid profile email
In VoidAuth OIDC App Page:
Client ID: your-client-id
Auth Method: Client Secret Post
Client Secret: your-client-secret
Redirect URLs:
- https://immich.example.com/auth/login
- https://immich.example.com/user-settings
- app.immich:///oauth-callback Jellyfin
WARNING
The Jellyfin SSO Plugin repository has been archived. It still works, but it seems that there will be no further development or maintenance.
Install the Jellyfin SSO Plugin. Navigate to Dashboard > Plugins > Catalog > Repositories and add:
Name: Jellyfin SSO
URL: https://raw.githubusercontent.com/9p4/jellyfin-plugin-sso/manifest-release/manifest.json
Install SSO-Auth from the Catalog and restart Jellyfin. Then navigate to Dashboard > Plugins > My Plugins > SSO-Auth:
Jellyfin SSO-Auth Configuration:
Name: VoidAuth
OID Endpoint: Copy from VoidAuth OIDC Info (OIDC Issuer Endpoint)
OpenID Client ID: your-client-id
OID Secret: your-client-secret
Enabled: Yes
Enable Authorization by Plugin: Yes
Enable All Folders: Yes
Roles: your-user-role
Admin Roles: your-admin-role
Role Claim: groups
Request Additional Scopes: groups
Set default username claim: preferred_username
Scheme Override: https
In VoidAuth OIDC App Page:
Client ID: your-client-id
Auth Method: Client Secret Post
Client Secret: your-client-secret
Redirect URLs: https://jellyfin.example.com/sso/OID/redirect/VoidAuth
TIP
Follow the instructions on the Jellyfin SSO Plugin repository for how to make an SSO Login button on the Jellyfin Login page.
 Jellyseerr
CAUTION
OIDC support in Jellyseerr is currently experimental and only available in the preview image: fallenbagel/jellyseerr:preview-OIDC. This feature is under active development and may have bugs or breaking changes.
Navigate to Settings from the left-hand menu in Jellyseerr. Scroll to the OpenID Connect section. See the Jellyseerr OIDC Discussion for more details.
Jellyseerr OpenID Connect Configuration:
Enable OpenID Connect Sign-In: ☑ (checked)
Display Name: VoidAuth
Issuer URL: Copy from VoidAuth OIDC Info (OIDC Issuer Endpoint)
Client ID: your-client-id
Client Secret: your-client-secret
Scopes: openid profile email groups
Scroll down and click Save Changes.
In VoidAuth OIDC App Page:
Client ID: your-client-id
Auth Method: Client Secret Post
Client Secret: your-client-secret
Redirect URLs: https://jellyseerr.example.com/login?provider=voidauth&callback=true
TIP
- If running behind a reverse proxy, enable Proxy Support in Jellyseerr settings
- Ensure proper HTTP/HTTPS scheme configuration to avoid redirect URI issues
NOTE
Jellyseerr is being merged into a unified repository at seerr-team/seerr. This documentation will be updated once the merge is complete and OIDC support is available in the stable release.
 Karakeep
Karakeep can be set up to use VoidAuth as an OIDC Provider using environment variables. See the Karakeep Authentication Documentation for full details.
Environment Variables:
OAUTH_WELLKNOWN_URL="Copy from VoidAuth OIDC Info (Well-Known Endpoint)"
OAUTH_CLIENT_ID="your-client-id"
OAUTH_CLIENT_SECRET="your-client-secret"
NEXTAUTH_URL="https://karakeep.example.com"
In VoidAuth OIDC App Page:
Client ID: your-client-id
Auth Method: Client Secret Basic
Client Secret: your-client-secret
Redirect URLs: https://karakeep.example.com/api/auth/callback/custom Komodo
NOTE
Komodo is not automatically provisioning users via OIDC if the environment variable KOMODO_DISABLE_USER_REGISTRATION=true is configured. If you generally want to prevent new user registrations:
- Temporarily set the environment variable
KOMODO_DISABLE_USER_REGISTRATION=false - Restart the Komodo core container
- Login to Komodo via VoidAuth OIDC to create a disabled account
- Login to Komodo as admin, go to Settings -> Users, enable the newly created account with type
Oidc. Optionally make the account admin. - Set the environment variable back to
KOMODO_DISABLE_USER_REGISTRATION=true - Restart the Komodo core container
Environment Variables:
KOMODO_OIDC_ENABLED=true
KOMODO_OIDC_PROVIDER="Copy from VoidAuth OIDC Info (OIDC Issuer Endpoint)"
KOMODO_OIDC_CLIENT_ID="your-client-id"
KOMODO_OIDC_CLIENT_SECRET="your-client-secret"

# Temporarily:
KOMODO_DISABLE_USER_REGISTRATION=false
# But generally:
KOMODO_DISABLE_USER_REGISTRATION=true
In VoidAuth OIDC App Page:
Client ID: your-client-id
Auth Method: Client Secret Basic
Client Secret: your-client-secret
Redirect URLs: https://komodo.example.com/auth/oidc/callback Manyfold
Environment Variables:
MULTIUSER="true"
PUBLIC_HOSTNAME="manyfold.example.com"
OIDC_CLIENT_ID="your-client-id"
OIDC_CLIENT_SECRET="your-client-secret"
OIDC_ISSUER="Copy from VoidAuth OIDC Info (OIDC Issuer Endpoint)"
OIDC_NAME="VoidAuth"

# Optional: Force OIDC login
# FORCE_OIDC="true"
In VoidAuth OIDC App Page:
Client ID: your-client-id
Auth Method: Client Secret Basic
Client Secret: your-client-secret
Redirect URLs: https://manyfold.example.com/users/auth/openid_connect/callback Mastodon
Environment Variables:
OIDC_ENABLED="true"
OIDC_DISCOVERY="true"
OIDC_ISSUER="Copy from VoidAuth OIDC Info (OIDC Issuer Endpoint)"
OIDC_DISPLAY_NAME="VoidAuth"
OIDC_CLIENT_ID="your-client-id"
OIDC_CLIENT_SECRET="your-client-secret"
OIDC_SCOPE="openid,profile,email"
OIDC_UID_FIELD="preferred_username"
OIDC_REDIRECT_URI="https://mastodon.example.com/auth/auth/openid_connect/callback"
OIDC_SECURITY_ASSUME_EMAIL_IS_VERIFIED="true"

# Optional: Allow reattaching auth providers
# ALLOW_UNSAFE_AUTH_PROVIDER_REATTACH="true"
In VoidAuth OIDC App Page:
Client ID: your-client-id
Auth Method: Client Secret Basic
Client Secret: your-client-secret
Redirect URLs: https://mastodon.example.com/auth/auth/openid_connect/callback Memos
Memos
Connect to Memos as an admin user. Click on the user icon at the bottom left, then on Settings, and finally on SSO. Click on the Create button and select Custom from the Template menu.
Memos SSO Configuration:
Client ID: your-client-id
Client Secret: your-client-secret
Authorization endpoint: Copy from VoidAuth OIDC Info (Authorization Endpoint)
Token endpoint: Copy from VoidAuth OIDC Info (Token Endpoint)
User endpoint: Copy from VoidAuth OIDC Info (UserInfo Endpoint)
Scopes: openid profile email offline_access
Identifier: preferred_username
Display Name: name
Email: email
In VoidAuth OIDC App Page:
Client ID: your-client-id
Auth Method: Client Secret Post
Client Secret: your-client-secret
Redirect URLs: https://memos.example.com/auth/callback
NOTE
Scopes are separated by spaces, not by commas.
 Open WebUI
In the following example, only users in VoidAuth with the group users or admins will be able to log in. Adjust these group names as needed.
Environment Variables:
WEBUI_URL="https://openwebui.example.com"
ENABLE_OAUTH_SIGNUP="true"
OAUTH_MERGE_ACCOUNTS_BY_EMAIL="true"
OAUTH_CLIENT_ID="your-client-id"
OAUTH_CLIENT_SECRET="your-client-secret"
OPENID_PROVIDER_URL="Copy from VoidAuth OIDC Info (Well-Known Endpoint)"
OAUTH_PROVIDER_NAME="VoidAuth"
OAUTH_SCOPES="openid profile groups email"
ENABLE_OAUTH_ROLE_MANAGEMENT="true"
OAUTH_ROLES_CLAIM="groups"
OAUTH_ALLOWED_ROLES="users,admins"
OAUTH_ADMIN_ROLES="admins"
In VoidAuth OIDC App Page:
Client ID: your-client-id
Auth Method: Client Secret Basic
Client Secret: your-client-secret
Redirect URLs: https://openwebui.example.com/oauth/oidc/callback Pangolin
Navigate to your Pangolin instance and follow the OAuth/OIDC Guide in the Pangolin documentation.
Pangolin OAuth Configuration:
Client ID: your-client-id
Client Secret: your-client-secret
Auth URL: Copy from VoidAuth OIDC Info (Authorization Endpoint)
Token URL: Copy from VoidAuth OIDC Info (Token Endpoint)
In VoidAuth OIDC App Page:
Client ID: your-client-id
Auth Method: Client Secret Basic
Client Secret: your-client-secret
Redirect URLs: https://pangolin.example.com/auth/idp/1/oidc/callback
NOTE
The Redirect URL is displayed after creating VoidAuth as an identity provider in Pangolin settings. The callback path may vary if you have multiple OIDC providers configured (e.g., /auth/idp/2/oidc/callback).
TIP
You can either enable automatic user creation when configuring VoidAuth as an identity provider in Pangolin, or manually create users in your Pangolin organization settings using their OpenID Connect ID as the username. The ID format is XXXXXXXX-XXXX-XXXX-XXXXXXXXXXXX and can be found in the VoidAuth URL when viewing the user profile. Users will display with their email in Pangolin, not the ID.
 Paperless-ngx
Environment Variables:
PAPERLESS_APPS="allauth.socialaccount.providers.openid_connect"
PAPERLESS_SOCIALACCOUNT_PROVIDERS='{"openid_connect": {"OAUTH_PKCE_ENABLED": true, "APPS": [{"provider_id": "voidauth","name": "VoidAuth","client_id": "your-client-id","secret": "your-client-secret","settings": {"fetch_userinfo": true,"server_url": "https://voidauth.example.com/oidc","token_auth_method": "client_secret_basic"}}]}}'

# Optional: Enable during initial setup if signups are disabled
# PAPERLESS_SOCIALACCOUNT_ALLOW_SIGNUPS="true"

# Optional: Disable local login after OIDC is configured
# PAPERLESS_DISABLE_REGULAR_LOGIN="true"
In VoidAuth OIDC App Page:
Client ID: your-client-id
Auth Method: Client Secret Basic
Client Secret: your-client-secret
Redirect URLs: https://paperless.example.com/accounts/oidc/voidauth/login/callback/
NOTE
If PAPERLESS_SOCIALACCOUNT_ALLOW_SIGNUPS is set to false in your environment, temporarily set it to true to complete the initial configuration, then set it back to false.
TIP
To link an existing local user to VoidAuth:
- Log in via the VoidAuth button on the Paperless login screen
- When prompted to register, do not proceed
- Log in with your local user and go to Profile
- Link your local account to VoidAuth - the VoidAuth email should now appear in connected 3rd party accounts
 Portainer
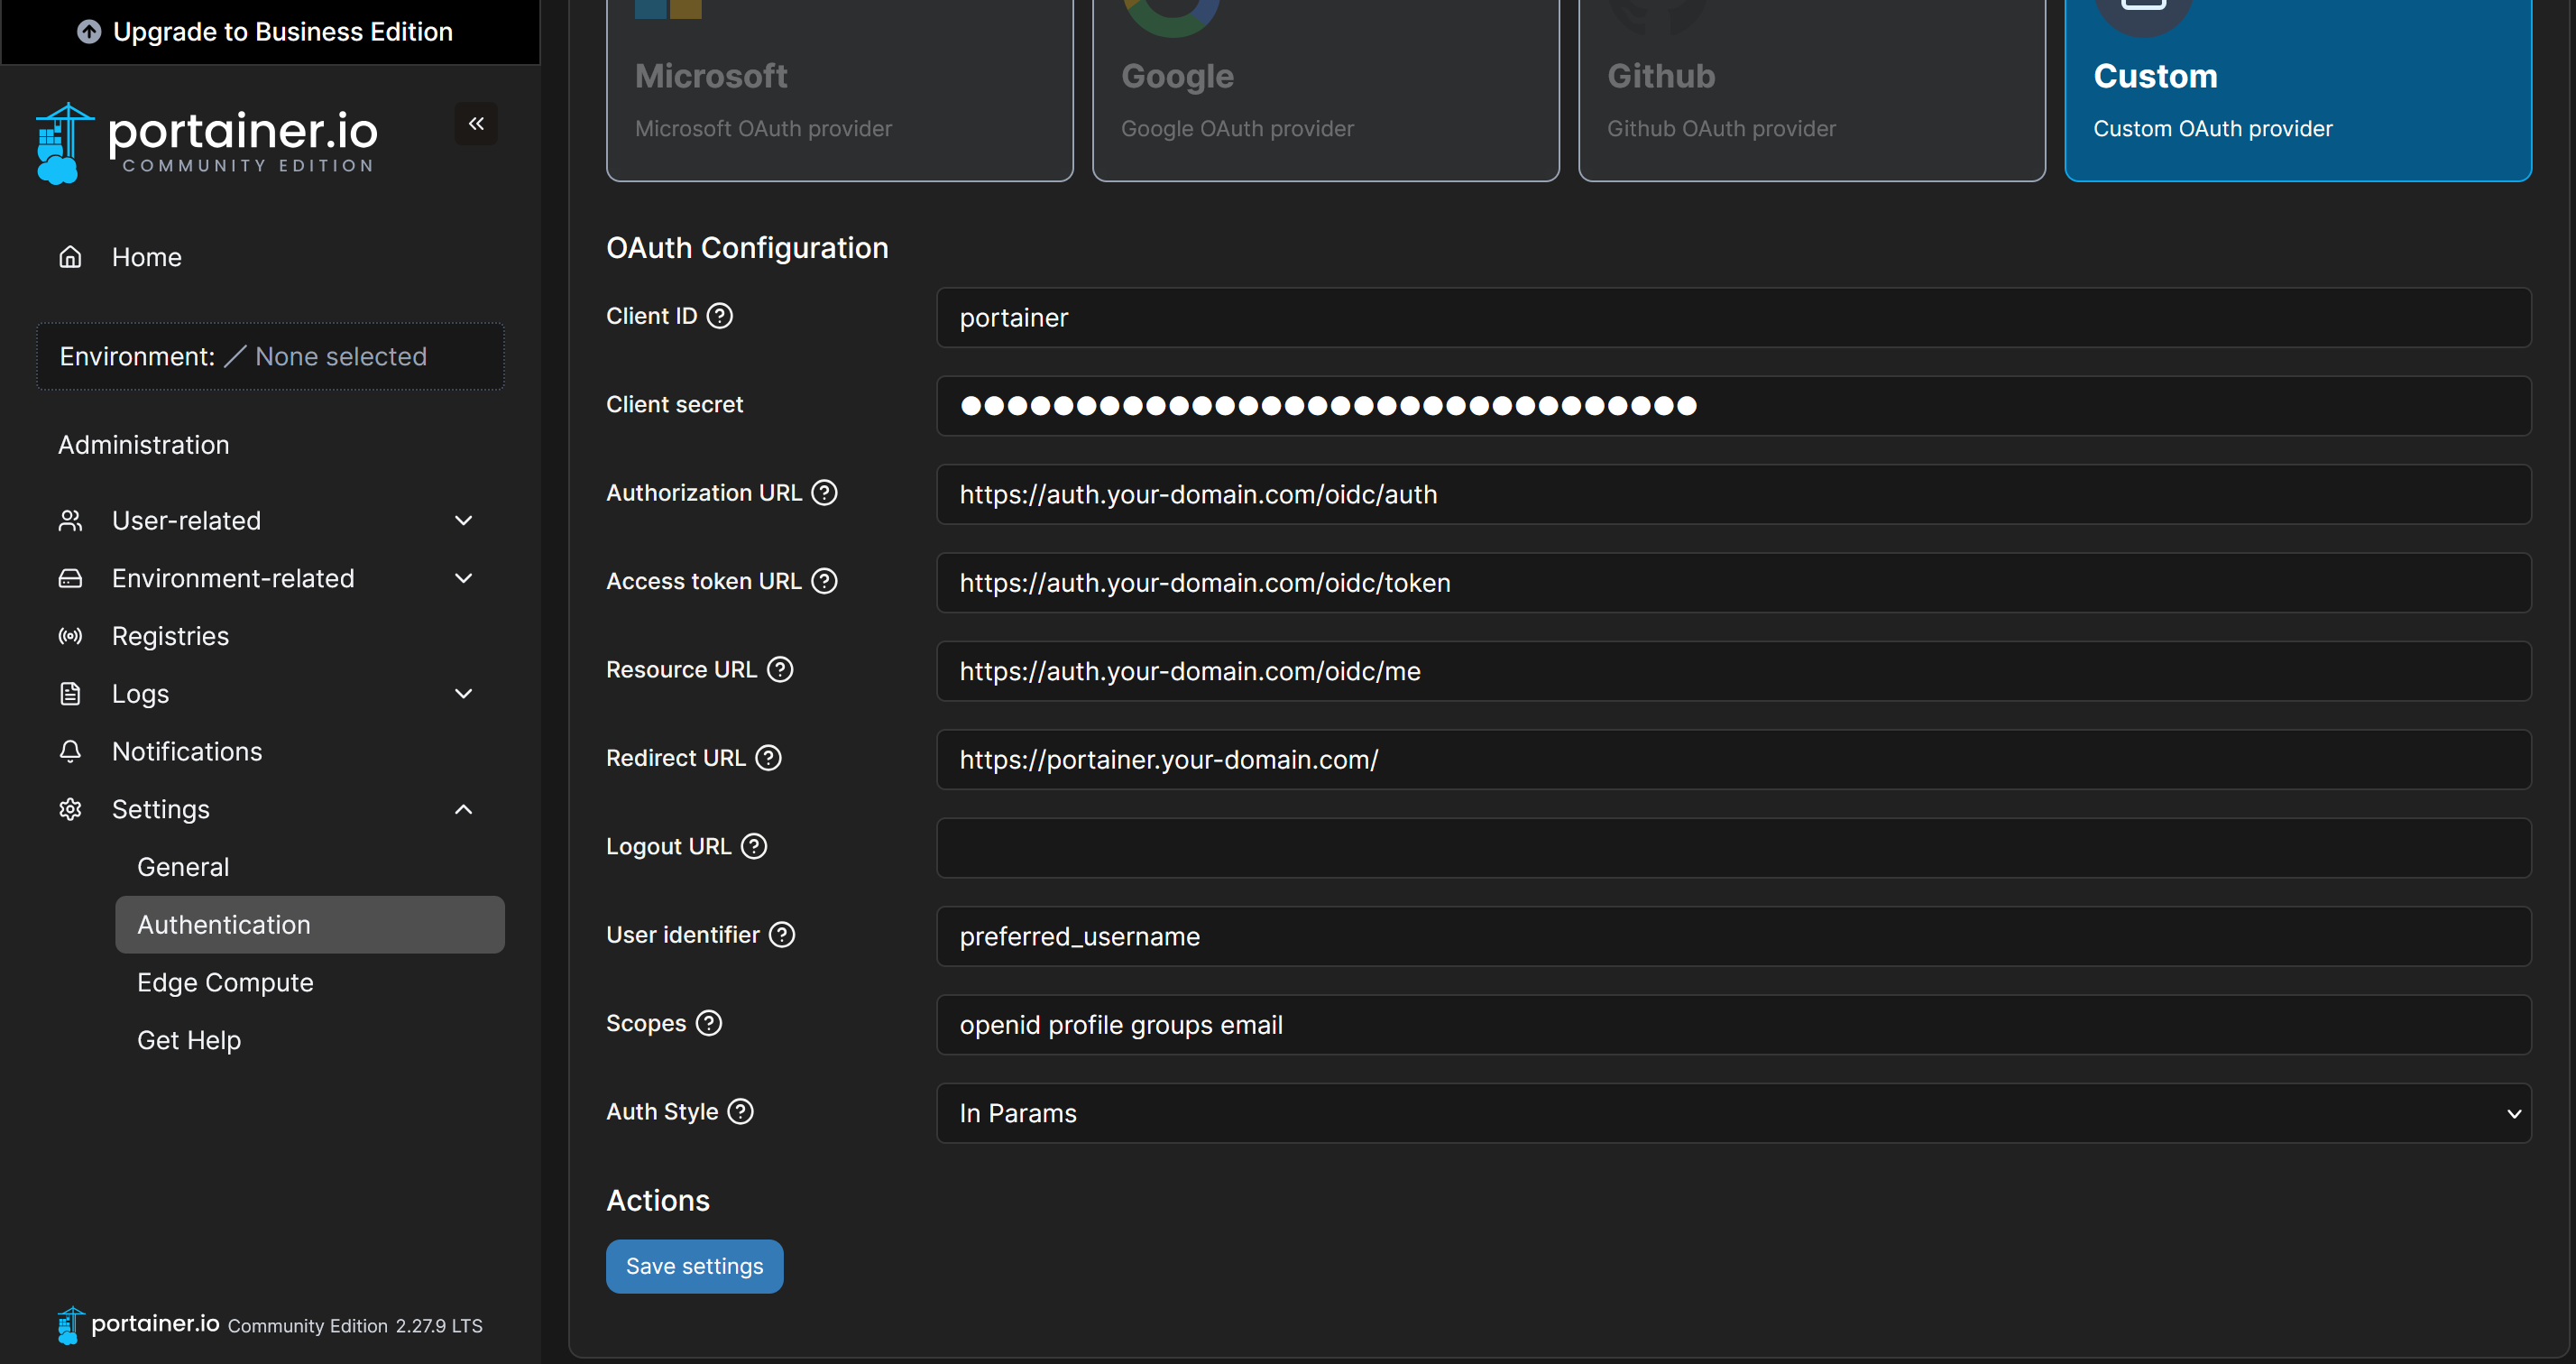
Navigate to Settings > Authenticate in Portainer. Select OAuth from the Authentication Methods, then select Custom OAuth Provider.
Portainer OAuth Configuration:
Client ID: your-client-id
Client secret: your-client-secret
Authorization URL: Copy from VoidAuth OIDC Info (Authorization Endpoint)
Access token URL: Copy from VoidAuth OIDC Info (Token Endpoint)
Resource URL: Copy from VoidAuth OIDC Info (UserInfo Endpoint)
Redirect URL: https://portainer.example.com
User identifier: preferred_username
Scopes: openid profile groups email
Auth Style: In Params
In VoidAuth OIDC App Page:
Client ID: your-client-id
Auth Method: Client Secret Post
Client Secret: your-client-secret
Redirect URLs: https://portainer.example.com
NOTE
Scopes are separated by spaces, not by commas.
 Proxmox PVE
Proxmox PVE can be set up to use VoidAuth as an OIDC Provider in two ways: through Web GUI or Config File. See the Proxmox PVE Authentication Realms Documentation for full details.
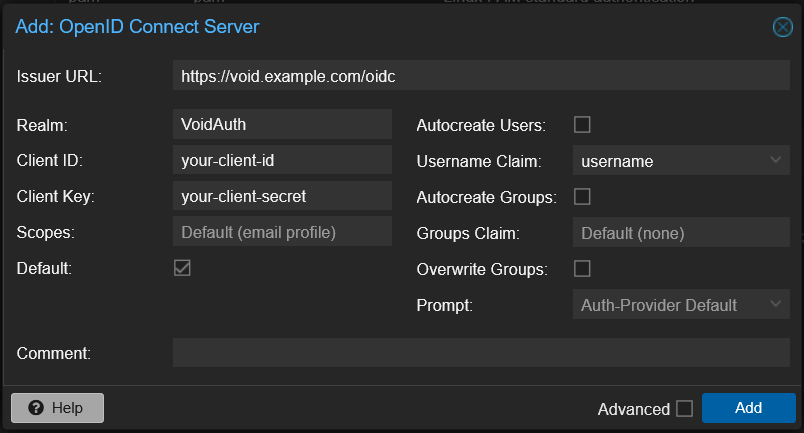
Login to your Proxmox PVE. Under Server View side panel, click Datacenter. Under the second side panel, click Permissions > Realms. Under the Realms panel, click Add > OpenID Connect Server.
Proxmox OpenID Connect Configuration:
Issuer URL: Copy from VoidAuth OIDC Info (OIDC Issuer Endpoint)
Realm: VoidAuth
Client ID: your-client-id
Client Key: your-client-secret
Scopes: email profile
Username Claim: preferred_username
Prompt: Auth-Provider Default

# Optional
# Default: (Make VoidAuth your default provider)
# Autocreate Users: (Advanced)
# Autocreate Groups: (Advanced)
# Groups Claim: (Advanced)
# Override Groups: (Advanced)
In VoidAuth OIDC App Page:
Client ID: your-client-id
Auth Method: Client Secret Post
Client Secret: your-client-secret
Redirect URLs: https://pve.example.com
NOTE
If you are not using Autocreate, you will need to create Groups and Users manually. PVE permissions can be quite complicated. We recommend following through their Wiki as each setup requires its own set.
 Seafile
Add these lines to the configuration file named seahub_settings.py:
Seafile Configuration:
ENABLE_OAUTH = True
OAUTH_CREATE_UNKNOWN_USER = True
OAUTH_ACTIVATE_USER_AFTER_CREATION = True
OAUTH_ENABLE_INSECURE_TRANSPORT = False

OAUTH_CLIENT_ID = "your-client-id"
OAUTH_CLIENT_SECRET = "your-client-secret"
OAUTH_REDIRECT_URL = "https://seafile.example.com/oauth/callback/"
OAUTH_PROVIDER_DOMAIN = "voidauth.example.com"
OAUTH_PROVIDER = "voidauth.example.com"
OAUTH_AUTHORIZATION_URL = "https://voidauth.example.com/oidc/auth"
OAUTH_TOKEN_URL = "https://voidauth.example.com/oidc/token"
OAUTH_USER_INFO_URL = "https://voidauth.example.com/oidc/me"
OAUTH_SCOPE = ["openid", "profile", "email"]
OAUTH_ATTRIBUTE_MAP = {
    "sub": (True, "uid"),
    "email": (False, "email"),
    "name": (False, "name"),
}
In VoidAuth OIDC App Page:
Client ID: your-client-id
Auth Method: Client Secret Basic
Client Secret: your-client-secret
Redirect URLs: https://seafile.example.com/oauth/callback/
NOTE
You will need to reboot Seafile server for the modifications to take effect.
 Sync-in
Sync-in can be configured to use VoidAuth for OIDC by adding these lines to its environment.yaml file.
Sync-in Environment Yaml File
auth:
  provider: oidc
  oidc:
    issuerUrl: # Copy from VoidAuth OIDC Info (OIDC Issuer Endpoint)
    clientId: 'your-client-id'
    clientSecret: 'your-client-secret'
    redirectUri: 'http://syncin.example.com/api/auth/oidc/callback' # Must exactly match the entry in VoidAuth

    security:
      scope: 'openid email profile groups'
      # requireVerifiedEmail: true # Enable to only allow users with verified emails. Should be used in conjunction with VoidAuth EMAIL_VERIFICATION environment variable

    # Additional OIDC Options (Optional)
    options:
      autoCreateUser: true       # Automatically creates local accounts on first OIDC sign-in
      # enablePasswordAuth: false  # Disables local login
      adminRoleOrGroup: # Set to OIDC Group you can assign to Sync-in admins
      # storageQuotaClaim: 'sync_in_storage_quota'
      # autoRedirect: true         # Automatically redirects users to the OIDC provider for authentication, skipping Sync-in login page
      buttonText: 'Continue with OpenID Connect'
NOTE
You will need to restart the Sync-in server for the modifications to the environment.yaml take effect.
In VoidAuth OIDC App Page:
Client ID: your-client-id
Auth Method: Client Secret Basic
Client Secret: your-client-secret
Redirect URLs: https://sync-in.example.com/api/auth/oidc/callback Unraid
Navigate to Settings > Management Access > Unraid API Settings in the Unraid WebGUI. Add a new OIDC provider by clicking the + button. See the Unraid OIDC Provider Setup for full details.
Unraid OAuth Configuration:
Provider ID: voidauth
Provider Name: VoidAuth
Client ID: your-client-id
Client Secret: your-client-secret
Issuer URL: Copy from VoidAuth OIDC Info (OIDC Issuer Endpoint)
OAuth Scopes: openid profile email
NOTE
You will need to set at least one authorization rule and verify that the provider settings are applied. A simple authorization rule can be used to allow specific email domains, email addresses or specific users. Refer to the Unraid documentation for examples.
In VoidAuth OIDC App Page:
Client ID: your-client-id
Auth Method: Client Secret Post
Client Secret: your-client-secret
Redirect URLs: https://unraid.example.com/graphql/api/auth/oidc/callback Vaultwarden
NOTE
Vaultwarden can be configured in three different ways: environment variables, ENV_FILE or via a config.json (editable through the admin page). The steps below assumes the admin page has been enabled, but can be applied to all options. For details on the environment variables options, refer to the Vaultwarden documentation.
Navigate to the Vaultwarden Admin Panel, and expand the OpenID Connect SSO settings section.
Vaultwarden Admin Panel Configuration:
Enabled: (check)
Client ID: your-client-id
Client Key: your-client-secret
Authority Server: Copy from VoidAuth OIDC Info (OIDC Issuer Endpoint)
Authorization request scopes: email profile
In VoidAuth OIDC App Page:
Client ID: your-client-id
Auth Method: Client Secret Post
Client Secret: your-client-secret
Redirect URLs: https://vaultwarden.example.com/identity/connect/oidc-signin WikiJS
Connect to WikiJS portal as an admin. Go to Configuration Panel, and then Authentication Tab. Create a new authentication strategy using "Generic OpenID Connect / OAuth 2".
WikiJS Authentication Configuration:
Client ID: your-client-id
Client Secret: your-client-secret
Authorization Endpoint URL: Copy from VoidAuth OIDC Info (Authorization Endpoint)
Token Endpoint URL: Copy from VoidAuth OIDC Info (Token Endpoint)
User Info Endpoint URL: Copy from VoidAuth OIDC Info (UserInfo Endpoint)
Issuer: Copy from VoidAuth OIDC Info (OIDC Issuer Endpoint)
Email Claim: email
Display Name Claim: name
Groups Claim: groups
Logout URL: Copy from VoidAuth OIDC Info (Logout Endpoint)
In VoidAuth OIDC App Page:
Client ID: your-client-id
Auth Method: Client Secret Post
Client Secret: your-client-secret
Redirect URLs: https://wikijs.example.com/login/{token-from-wikijs-strategy}/callback
NOTE
Make sure you enabled the authentication strategy. The redirect URL contains a unique token that is displayed in the WikiJS authentication strategy view.
 ZeroByte
Navigate to Settings > Organization > Single Sign-On in ZeroByte and click Register New.
ZeroByte Single Sign-On Configuration:
Provider ID: voidauth
Organization Domain: https://voidauth.example.com
Issuer URL: Copy from VoidAuth OIDC Info (OIDC Issuer Endpoint)
Discovery Endpoint: Copy from VoidAuth OIDC Info (Well-Known Endpoint)
Client ID: your-client-id
Client Secret: your-client-secret

# Optional
# Link matching emails to existing accounts: (enable)
In VoidAuth OIDC App Page:
Client ID: your-client-id
Auth Method: Client Secret Post
Client Secret: your-client-secret
Redirect URLs: https://zerobyte.example.com/api/auth/sso/callback/voidauth
NOTE
The final path segment in the redirect URL must match the Provider ID configured in ZeroByte.